
One of the more prevalent attack vectors abused by bad actors is brute force attack against access controls. Coincidently, one of the more effective defensive controls available to administrators is to adopt a deny-all mindset when deploying defensive controls.
One very effective way of doing this with access controls is to block all users by default and whitelist authorized users. Our SSH IPauth service helps streamline this process for administrators.
How SSH IPAuth Works
To help administrators create their own whitelist control list, we created an authentication key pair for your server to authenticate your current IP address to a desired server.
It is divided into 2 parts:
| Part | Explanation |
|---|---|
| authentication URL | This is used to dynamically capture your local IP. Please bookmark this link. |
| server Key URL | This is used to dynamically pull the new local IP. |
The design allows you to deploy a whitelist model on your server. Save the authentication url (e.g.,bookmark in your browser) and use the server key URL to pull the new IP address. This is good if your IP changes a lot but still want to employ a whitelist model (e.g., travel).
How to Use SSH IP Auth
From your NOC dashboard, navigate to the SSH IPauth menu option in the navigation pane.
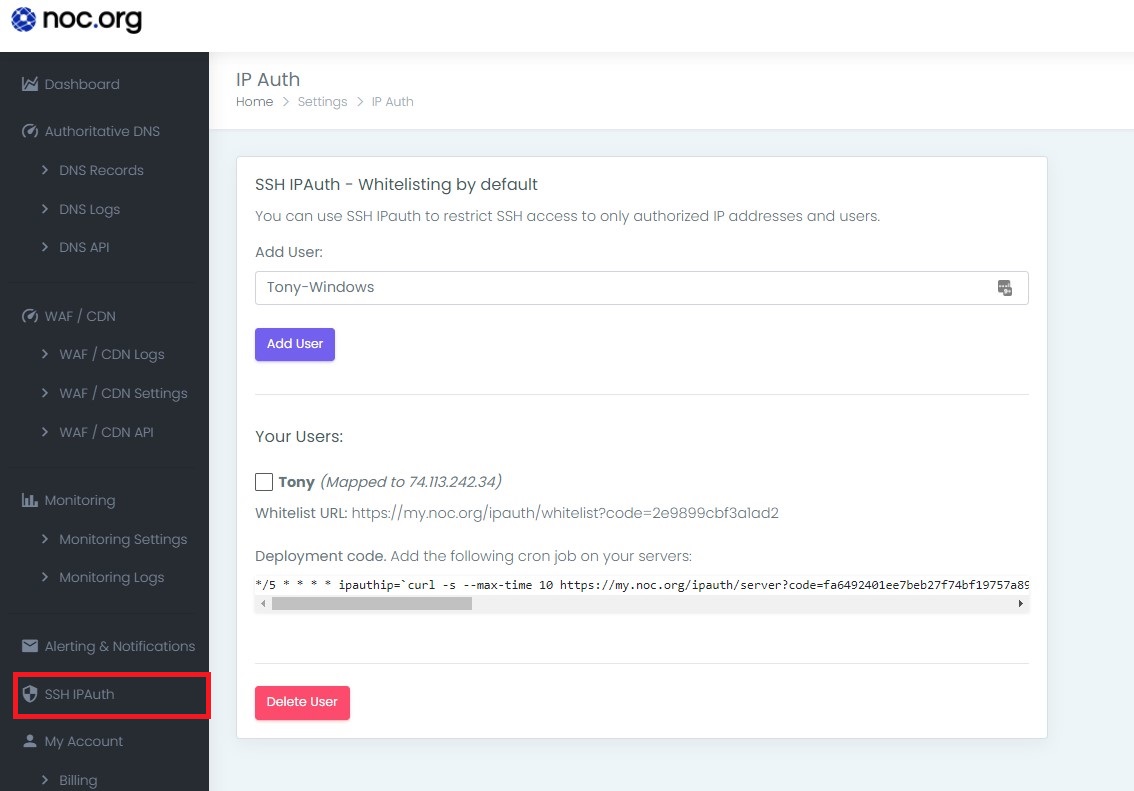
From there, create the user you want to bind an IP to. In my case, I have one for Tony (me), and what you see a unique URL slug (the authentication url) for this user.
In this example, you see the following values for my new user:
| Part | Explanation |
|---|---|
| authentication URL | https://my.noc.org/ipauth/whitelist?code=2e9899cbf3a1ad2 |
| server Key URL | https://my.noc.org/ipauth/server?code=fa6492401ee7beb27f74bf19757a89b9c8800ae5 |
To use, save the authentication URL in your favorite bookmarks, or create a cron job to knock on it every 5 minutes.
Then deploy the server Key URL to your server via a cron job using something like this.
*/5 * * * * ipauthip=`curl -s --max-time 10 https://my.noc.org/ipauth/server?code=fa6492401ee7beb27f74bf19757a89b9c8800ae5 | grep "success: ip address:" | cut -d " " -f 4 |grep -Eo "^[0-9\.]+$"`; storedipauth=`cat /var/run/ipauth 2>/dev/null`; if [ ! "x$storedipauth" = "x$ipauthip" ]; then echo "whitelisting new ip: $ipauthip"; /sbin/iptables -I INPUT -s $ipauthip -j ACCEPT; echo $ipauthip > /var/run/ipauth; fiThis assumes you’re using something like IPTables for your firewall.
Alternatively, you can deploy it via a shell script like this
#!/bin/sh
        CURIP=`curl --max-time 5 -s "https://my.noc.org/ipauth/server?code=fa6492401ee7beb27f74bf19757a89b9c8800ae5" |
        grep "success" | cut -d ":" -f 3 | cut -d "," -f 1`
        rm -f /root/ipt1
        /sbin/iptables -nL > /root/ipt1

        if [ ! "x$CURIP" = "x" ]; then
            grep "ACCEPT" /root/ipt1 |grep "$CURIP" >/dev/null 2>&1
            if [ ! $? = 0 ]; then
            /sbin/iptables -I INPUT --source "$CURIP"  -j ACCEPT -m comment --comment "IPAuth IP: $CURIP"
            fi
        fi

        rm -f /root/ipt1
And call it via a cron job like this:
# crontab -e */2 * * * * /etc/path/to/your/file/ipupdater.sh